Getting Started
Please refer to our Quickstart Guide. The Full API Reference, Library Source Code, and an Example Application is documented in our GitHub repo.Installing the Library
- Snippet
- NPM/Yarn
The easiest way to install the library is to load it from our CDN to your website. Paste the following code snippet right before the closing Within the Altogether, with your particular library configuration, the code snippet should follow this basic structure:
</head> tag in your page HTML.script tags, create an instance of the Mixpanel object by calling .init() using your project token in your JS file. Any methods called from this object will target your project.Library Configuration
The Mixpanel object can be initialized with different configurations. See a complete list of the configuration options and default values here. You can override the default configuration using theconfig argument when initializing the library.
Example Usage
.set_config method.
Example Usage
Autocapture
Starting with SDK version 2.60.0, the Javascript SDK can autocapture events when you enable it. To do so, enable the autocapture configuration:.mp-no-track class to any element you wish to exclude from tracking. You can also opt an individual element out of being included in any tracking (including the $elements prop of another target’s event) using the .mp-sensitive class.
Alternatively, you can update your Autocapture configuration using different blocking options:
block_selectors: used to block specific classes
block_url_regexes: used to block Autocapture from tracking on certain pages
| Option | Description | Default |
|---|---|---|
click | When set to true, Mixpanel will track element clicks. It will not track textContent unless capture_text_content is also set to true. | true |
dead_click | When set to true, Mixpanel will track dead clicks on elements. You can also fine tune thresholds for classifying dead clicks using the Dead Click Options below. | true |
rage_click | When set to true, Mixpanel will track rage clicks on elements. You can also fine tune thresholds for classifying rage clicks using the Rage Click Options below. | true |
input | When set to true, Mixpanel will track when an input is provided. It will not capture input content. | true |
pageview | When set, Mixpanel will collect pageviews when some components of the URL change — including UTM parameters. | "full-url" |
scroll | When set, Mixpanel will collect page scrolls at specified scroll intervals. | true |
submit | When set to true, Mixpanel will track form submissions (but not submission content). | true |
capture_text_content | When set to true, Mixpanel will capture the textContent of any element. | false |
capture_extra_attrs | Enables specification of additional attributes to track. | [] |
scroll_depth_percent_checkpoints | Establishes the scroll depth intervals which trigger Page Scroll event. | [25, 50, 75, 100] |
scroll_capture_all | When set to true, overrides scroll_depth_percentage_checkpoints and captures all scroll events. | false |
block_url_regexes | Opts out specific pages from Autocapture. | [] |
allow_url_regexes | Opts in specific pages to Autocapture. | [] |
block_selectors | Opts out specific classes from Autocapture. | [] |
allow_selectors | Opts in specific classes to Autocapture. | [] |
block_attrs | Opts out specific attributes from Autocapture. | [] |
allow_element_callback | A user-provided function that determines whether a specific element should be tracked via Autocapture or not. The function receives the element as its first argument, and the DOM event as its second argument, and should return true if the element should be tracked (otherwise the element will NOT be tracked). | not set |
block_element_callback | A user-provided function that determines whether a specific element should be blocked from tracking via Autocapture or not. The function receives the element as its first argument, and the DOM event as its second argument, and should return true if the element should be blocked. | not set |
| Option | Description | Default |
|---|---|---|
timeout_ms | Time in milliseconds to wait after a click before qualifying it as dead. | 500 |
| Option | Description | Default |
|---|---|---|
threshold_px | Maximum pixel distance between clicks to be considered in the same location. | 30 |
timeout_ms | Time window in milliseconds to group rapid consecutive clicks. | 1000 |
click_count | Minimum number of clicks required within the time window to trigger rage click detection. | 4 |
interactive_elements_only | When enabled, only tracks rage clicks on interactive elements (buttons, links, inputs, etc.) | false |
| HTML Element Attribute | Description |
|---|---|
aria-label | Provides an accessible name for an element, used by assistive technologies like screen readers. |
aria-labelledby | Identifies one or more elements that serve as labels for the current element, improving accessibility. |
aria-described-by | References an element that provides additional description or context for the current element. |
href | Specifies the URL of a linked resource, commonly used in <a> (anchor) and <link> elements. |
name | Defines the name of an input field, form, or metadata element, often used for form controls and <meta> tags. |
role | Defines the semantic role of an element to assist accessibility tools in interpreting the page structure. |
title | Provides additional information about an element, typically displayed as a tooltip when hovered. |
type | Specifies the type of an element, commonly used in <input> fields to define input behavior (e.g., text, password, email). |
| Event Property | Description |
|---|---|
$event_type | The type of DOM event that was captured (e.g., “click”, “submit”). |
$host | The hostname of the webpage where the event was triggered (e.g., example.com). |
$pathname | The path portion of the URL where the event occurred (e.g., /checkout). |
$elements | A list of elements that were involved in the event, useful for understanding element context. |
$target | The specific HTML element that triggered the event (e.g., a button or link). |
$el_attr__href | The href attribute of the target element if it is a link (<a> tag). |
$el_classes | The CSS classes associated with the target element. |
$el_tag_name | The tag name of the element that triggered the event (e.g., button, a, div). |
$viewportHeight | The height of the browser’s viewport at the time of the event. |
$viewportWidth | The width of the browser’s viewport at the time of the event. |
$clientX | The X-coordinate of the mouse pointer relative to the browser’s viewport when the event occurred. |
$clientY | The Y-coordinate of the mouse pointer relative to the browser’s viewport when the event occurred. |
$offsetX | The X-coordinate of the mouse pointer relative to the event target element. |
$offsetY | The Y-coordinate of the mouse pointer relative to the event target element. |
$pageHeight | The height of the full page. |
$pageWidth | The width of the full page. |
$pageX | The X-coordinate of the mouse pointer relative to the full page. |
$pageY | The Y-coordinate of the mouse pointer relative to the full page. |
$scroll_checkpoint | The percentage of scrollbar that has been reached when crossing specific thresholds (e.g., 25%, 50%, 75%, 100%). |
$scroll_height | The height of the scrollable area of the page. |
$scroll_percentage | The percentage of the page that has been scrolled. |
$scroll_top | The number of pixels the page has been scrolled vertically. |
$screenX | The X-coordinate of the mouse pointer relative to the screen. |
$screenY | The Y-coordinate of the mouse pointer relative to the screen. |
$x | The X-coordinate of the event, often synonymous with $pageX. |
$y | The X-coordinate of the event, often synonymous with $pageY. |
Sending Events
The /track endpoint will only validate events with timestamps within the last 5 days of the request. Events with timestamps older than 5 days will not be ingested. See below on best practices for historical imports.
Track Events
Once you initialized the Mixpanel object, call.track() to send an event by providing the event name and any event properties.
Example Usage
JavaScript
Avoid using names containing
$ or mp (e.g. $name, mp_country_code, etc.) as they are used by our reserved event properties which receive special treatment in our UI or are used for special processing.Timing Events
You can track the time it took for an action to occur, such as an image upload or a comment post, using.time_event(). This will mark the “start” of your action, which will be timed until you finish with a .track() call. The time duration is then recorded in the “Duration” property.
Javascript
Track Page Views
Page view tracking is turned off by default. Page view events can be added automatically on every page load by enabling thetrack_pageview config option when creating the Mixpanel object.
If you have enabled Autocapture, you do not need to set up precision tracking for page view unless you are implementing in a single-page application.
Example Usage
JavaScript
track_pageview setting does not auto-track page views in single-page applications. For tracking dynamic page views in single-page applications, the track_pageview option can also accept the following values for tracking.
Example Usage
JavaScript
$mp_web_page_view), and includes the event properties page title (current_page_title), URL components (current_domain, current_url_path, current_url_protocol, current_url_search), and marketing parameters. Additional page view event properties can be added.
Example Usage
JavaScript
Track UTM Tags
The JavaScript library will automatically add the following UTM parameters present on the page to events fired from that page load:- utm_source
- utm_campaign
- utm_medium
- utm_term
- utm_content
- utm_id
- utm_source_platform
- utm_campaign_id
- utm_creative_format
- utm_marketing_tactic
{stop_utm_persistence: true} to disable UTM param persistence (refer to our Release Notes in GitHub).
Example Usage
Javascript
- initial_utm_source
- initial_utm_campaign
- initial_utm_medium
- initial_utm_term
- initial_utm_content
- initial_utm_id
- initial_utm_source_platform
- initial_utm_campaign_id
- initial_utm_creative_format
- initial_utm_marketing_tactic
- dclid
- fbclid
- gclid
- ko_click_id
- li_fat_id
- msclkid
- sccid
- ttclid
- twclid
- wbraid
Other Tracking Methods
There are other less common methods for sending data to Mixpanel. Refer to the full API documentation.Importing Historical Events
The Javascript SDK is a tracking SDK designed for real-time tracking in a client-side environment. Calling the.track() method triggers a request to our /track API endpoint, which will validate for events with a timestamp that is within the last 5 days of the request. Events older than 5 days will not be ingested.
For bulk import of historical events older than 5 days, we will need to use the /import API endpoint which is optimized for scripting and supports ingesting historical data. We recommend the Python SDK (see the .import_data() function) and mixpanel-utils module (see the import_events() function) which both leverages the /import API for event ingestion.
Setting Super Properties
Super properties are global event properties that you define once and apply to all events. To register super properties, call.register().
Use .register_once() to register super properties without overwriting existing values.
Example Usage
cookie_expiration configuration.
Example Usage
Managing User Identity
You can handle the identity of a user using the.identify() and .reset() methods. Learn more about identity management and identifying users.
Identify
Call.identify() when you know the identity of the current user, passing in their user ID as an argument. This is typically at account registration and at log in.
Example Usage
Call Reset at Logout
Call.reset() to clear data attributed to a user when they logout. This will clear the cookie/local storage and allows you to handle multiple users on a single device.
Example Usage
JavaScript
Storing User Profiles
Once your users are identified, create user profiles by setting profile properties to describe them. Example profile properties include “name”, “email”, “company”, and any other demographic details about the user. The Javascript SDK provides a few methods for setting profile properties under.people, which will trigger requests to the /engage API endpoint.
Setting Profile Properties
You must call
.identify() before setting profile properties in order to associate the profile properties you set with the target user. If identify is not called, the profile update will be queued for ingestion until an identify call is made..people.set() method.
If a profile property already exists, it will be overwritten with the latest value provided in the method. If a profile property does not exist, it will be added to the profile.
Example Usage
JavaScript
Other Types Of Profile Updates
There are a few other methods for setting profile properties. See a complete reference of the available methods here. A few commonly used people methods are highlighted below:- .set_once()
- .append()
- .union()
- .increment()
The
.people.set_once() method set profile properties only if they do not exist yet. If it is setting a profile property that already exists, it will be ignored.Use this method if you want to set profile properties without the risk of overwriting existing data.Example UsageGroup Analytics
Read more about Group Analytics before proceeding. You will need to have the group key defined in your project settings first.
group_key and group_id.
group_keyis the event property that connects event data to a group. (e.g.company)group_idis the identifier for a specific group. (e.g.mixpanel,company_a,company_b, etc.)
Adding Users to a Group
All events must have the group key as an event property in order to be attributed to a group. Without the group key, an event cannot be attributed to a group. Call the.set_group() method to register the current user to a group, which would add the group_key as an event property set to the group_id value to all events moving forward.
Alternatively, you can manually add the group key property to be more selective about which events to attribute to a group.
Example Usage
group_key value as a list of multiple group_id values.
Call .add_group() to add additional group_id to an existing list.
Example Usage
Adding Group Identifiers to User Profiles
To connect group information to a user profile, include thegroup_key and group_id as a user profile property using the people.set() call.
Setting Group Profile Properties
Create a group profiles by setting group properties, similar to a user profile. For example, you may want to describe a company group with properties such as “ARR”, “employee_count”, and “subscription”. To set group profile properties, specify the group that needs to be updated by calling.get_group(), then set the group properties by chaining the .set() method, which will trigger a request to the /groups API endpoint.
Example Usage
Other Group Profile Methods
There are a few other methods for setting group profile properties under.group.
A few commonly used group methods are highlighted below:
- .set_once()
- .unset()
- .union()
- .remove()
The
.group.set_once() method set group profile properties only if they do not exist yet. If it is setting a profile property that already exists, it will be ignored.Use this method if you want to set group profile properties without the risk of overwriting existing data.Example UsageDebug Mode
To enable debug mode, set thedebug configuration option to true when initializing the Mixpanel object.
Example Usage
Remove this parameter before going into production.
mixpanel object is globally accessible and you can enable debug mode directly from the console by calling mixpanel.set_config({debug:true});.
Learn more about debugging.
Privacy-Friendly Tracking
You have control over the data you send to Mixpanel. The Javascript SDK provide methods to help you protect user data. Learn more about Privacy.Opt Out of Tracking
The Javascript SDK is initialized with tracking enabled by default. Use the.opt_out_tracking() method to opt the user out of data tracking and cookies/local storage for the current Mixpanel instance.
Example Usage
opt_out_tracking_by_default configuration. Once the user is ready to be tracked, call .opt_in_tracking() to start tracking.
Example Usage
EU Data Residency
Route data to Mixpanel’s EU servers by setting aapi_host configuration when creating the Mixpanel object.
Learn more about EU Data Residency.
Example Usage
India Data Residency
Route data to Mixpanel’s India servers by setting aapi_host configuration when creating the Mixpanel object.
Learn more about India Data Residency.
Example Usage
Disable Geolocation
The Javascript SDK parse the request IP address to generate geolocation properties for events and profiles. To disable geolocation, set theip to false when initializing the library.
Learn more about geolocation.
Example Usage
Disable Default Properties
To disable default properties from being tracked, add them to theproperty_blacklist config flag when initializing the library.
Example Usage
Mixpanel Cookie
By default, Mixpanel cookies send over HTTPS requests as part of the headers. However, Mixpanel’s JavaScript library provides a configuration to completely prevent the browser from transmitting your cookies with non-HTTPS requests. To enable this, set thesecure_cookie configuration from the default value of false to true.
Example Usage
secure_cookie: true, then your cookie data will not sent to the server.
Hosted Subdomains
By default, Mixpanel cookie works across subdomain, keeping Mixpanel’s Distinct ID and Super Properties consistent across your sub-domains. If you set persistence: ‘localStorage’, cross-subdomain tracking will not work because localStorage is not shared across subdomains. For hosted subdomains (see complete list of affected domains) that don’t allow cross-subdomain cookies, disable cross-subdomain cookie by setting thecross_subdomain_cookie configuration option to false. Alternatively, you can also use a CNAME to change from yourdomain.hostapp.com to yourdomain.com.
Example Usage
Tracking Via Proxy
You can route events from Mixpanel’s SDKs via a proxy in your own domain, which can reduce the likelihood of ad-blockers impacting your tracking.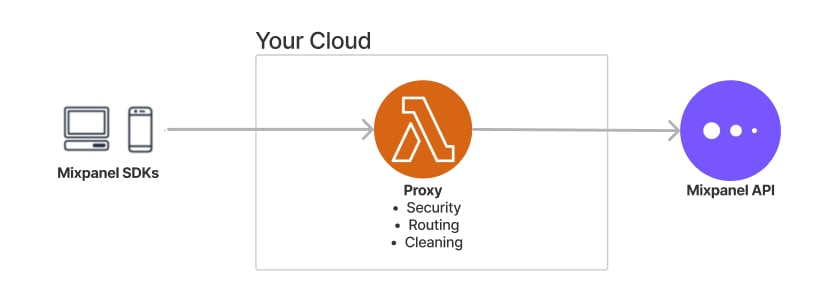
Step 1: Set up a proxy server
Below is a complete nginx reference configuration that proxies all Mixpanel traffic — tracking, Session Replay, and CDN assets — through your own domain. Adapt the path prefix and domain to your environment.Step 2: Point the JavaScript SDK at your proxy
SetMIXPANEL_CUSTOM_LIB_URL before the Mixpanel JS snippet to load the SDK itself through your proxy (not required if you load the SDK via npm/yarn):
mixpanel.init:
| Init option | Purpose |
|---|---|
api_host | Routes all tracking & Session Replay API calls through your proxy |
lib_base_path | Base path for all async SDK modules (recorder, targeting, etc.) — loads them from your proxy instead of cdn.mxpnl.com |
Troubleshooting
| Symptom | Likely cause |
|---|---|
| Session Replay recordings missing or corrupted | Proxy is not forwarding Authorization / Content-Encoding headers correctly |
| 4xx/5xx on tracking calls | Proxy path prefix not stripped properly — verify proxy_pass rewrites match your location blocks |
| Ad-blocker still blocks requests | CDN assets are still loaded directly from cdn.mxpnl.com — set MIXPANEL_CUSTOM_LIB_URL and lib_base_path |
Feature flag requests /flags failing with 401 | The /flags endpoint requires an Authorization header, unlike /track which only needs the project token. Ensure your proxy explicitly forwards the Authorization header to Mixpanel and does not strip it. |