> ## Documentation Index
> Fetch the complete documentation index at: https://docs.mixpanel.com/llms.txt
> Use this file to discover all available pages before exploring further.
# Tealium
This guide demonstrates how to set up Mixpanel event tracking and identity management with [Tealium's IQ Tag Management Platform](https://tealium.com/resource/datasheet/tealium-iq/). Setup should take about 10 minutes, and will go over the following 5 steps:
1. Configuring Tag Hooks (one-time)
2. Connecting Mixpanel to Tealium (one-time)
3. Sending Events
4. Adding Event Properties
5. Identifying Users (one-time)
### Prerequisite: Tag Hooks
Tealium’s iQ Tag Management creates event streams fueled by [UDOs](https://docs.tealium.com/platforms/javascript/universal-data-object/) (Universal Data Objects).
For web applications, UDOs are just javascript objects with a special shape; they are automatically detected by the [Tealium utag SDK](https://docs.tealium.com/platforms/javascript/universal-tag/), and they look like this:
```javascript theme={"system"}
var utag_data = {
"tealium_event": "page_view",
// ^ the key is always 'tealium_event'
// values will depend on your tealium implementation; standards: https://docs.tealium.com/platforms/javascript/track/#tealium_event
//UDOs can contain any number of custom params
"foo: "bar",
"baz": "qux"
}
```
In order to trigger Mixpanel events based on the values of `tealium_event`s, you’ll need to create a variable in Tealium’s data layer for `tealium_event` (the key not the value).
**This is a very common implementation pattern in Tealium**; if you’ve been using tealium for a while, you most likely have already mapped a UDO for `tealium_event` ... if you haven’t, here are the steps:
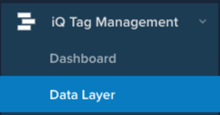
Find "data layer" in the main menu:
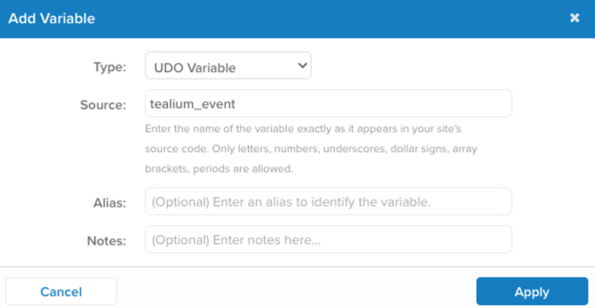
 Click "add variable":
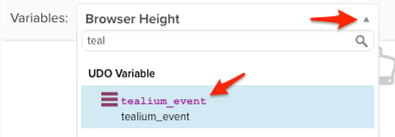
 The type is "UDO Variable"; the source is "tealium\_event" ... then click apply:
 Now save and publish!
 You should now see a "tealium\_event" variable in your UDOs:
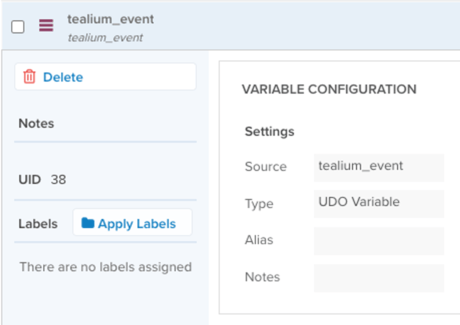 ( ^ it should look exactly like this! ^)
You are now ready to setup mixpanel events with triggers based on the *values* passed to `tealium_event` ... these values are usually strings like `page_view` , `product_view`, `search` etc...
## Connecting Mixpanel to Tealium
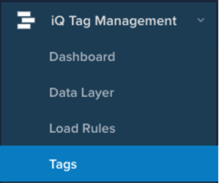
* Find the **tags** section of iQ Tag Manager:
( ^ it should look exactly like this! ^)
You are now ready to setup mixpanel events with triggers based on the *values* passed to `tealium_event` ... these values are usually strings like `page_view` , `product_view`, `search` etc...
## Connecting Mixpanel to Tealium
* Find the **tags** section of iQ Tag Manager:
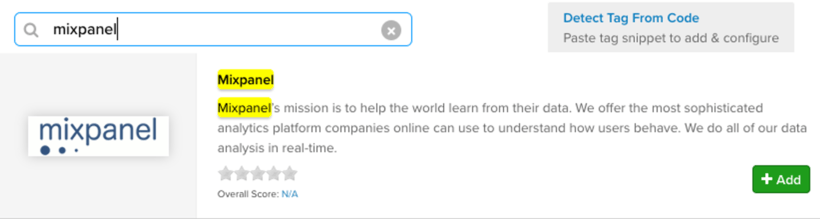
 * Click **add tags** and find 'mixpanel' using the search
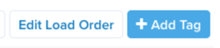 * Click **add** to bring the Mixpanel tag into your Tealium workspace.
 You can now connect your Mixpanel project to Tealium and configure the tag's behavior.
You will need a [mixpanel account](https://mixpanel.com/register/) and a [mixpanel project](/docs/admin/organizations-projects/manage-projects) to continue.
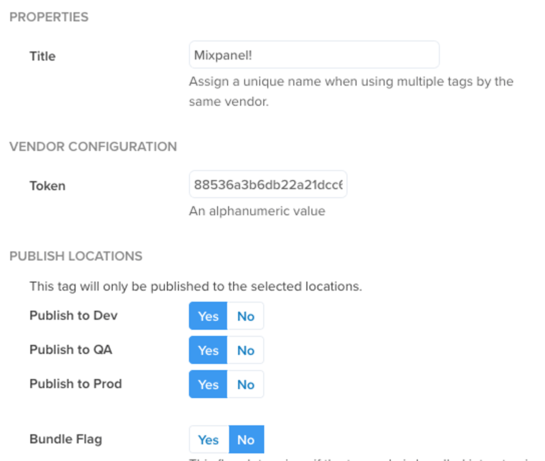
In the first section of the tag wizard, enter your [**mixpanel project token**](https://help.mixpanel.com/hc/en-us/articles/115004502806-Find-Project-Token-) and click Next:
You can now connect your Mixpanel project to Tealium and configure the tag's behavior.
You will need a [mixpanel account](https://mixpanel.com/register/) and a [mixpanel project](/docs/admin/organizations-projects/manage-projects) to continue.
In the first section of the tag wizard, enter your [**mixpanel project token**](https://help.mixpanel.com/hc/en-us/articles/115004502806-Find-Project-Token-) and click Next:
 Next, you’ll setup **load rules** which determine which pages mixpanel will be deployed on.
In order for the mixpanel tag to appear on your pages, you will need to add a condition to your **[load rules](https://docs.tealium.com/iq-tag-management/load-rules/about/)** using the wizard. Load rules make it possible to conditionally apply tags in certain cases, based on variables and conditions that Tealium is aware of.
For testing, it’s perfectly fine to say "load on all pages":
Next, you’ll setup **load rules** which determine which pages mixpanel will be deployed on.
In order for the mixpanel tag to appear on your pages, you will need to add a condition to your **[load rules](https://docs.tealium.com/iq-tag-management/load-rules/about/)** using the wizard. Load rules make it possible to conditionally apply tags in certain cases, based on variables and conditions that Tealium is aware of.
For testing, it’s perfectly fine to say "load on all pages":
 Mixpanel should now be deployed on all known Tealium pages of your site. Next, you will set up mappings which fire Mixpanel events based on mappings created in Tealium.
## Sending Events
The final section of the tag wizard is where **[data mappings](https://docs.tealium.com/iq-tag-management/data-mappings/about/)** are configured.
Data mappings are *essentially* a GUI-driven configuration that *will compose and deploy javascript snippets* on your Tealium-tagged pages (if the load rules are met).
That the goal of this guide is to turn something of this form:
```javascript theme={"system"}
var utag_data = { "tealium_event": "page_view" }
```
Into the equivalent javascript:
```javascript theme={"system"}
mixpanel.track('hello from tealium!')
```
When a user loads the page.
Here’s how you can setup this mapping:
* Use the `tealium_event` UDO variable to tell Tealium to pass `tealium_event` *values* to the mixpanel tag:
* Click "variables" dropdown and choose "tealium\_event"
Mixpanel should now be deployed on all known Tealium pages of your site. Next, you will set up mappings which fire Mixpanel events based on mappings created in Tealium.
## Sending Events
The final section of the tag wizard is where **[data mappings](https://docs.tealium.com/iq-tag-management/data-mappings/about/)** are configured.
Data mappings are *essentially* a GUI-driven configuration that *will compose and deploy javascript snippets* on your Tealium-tagged pages (if the load rules are met).
That the goal of this guide is to turn something of this form:
```javascript theme={"system"}
var utag_data = { "tealium_event": "page_view" }
```
Into the equivalent javascript:
```javascript theme={"system"}
mixpanel.track('hello from tealium!')
```
When a user loads the page.
Here’s how you can setup this mapping:
* Use the `tealium_event` UDO variable to tell Tealium to pass `tealium_event` *values* to the mixpanel tag:
* Click "variables" dropdown and choose "tealium\_event"
 * Bind the trigger `page_view` (from the UDO `tealium_event`) *to* the mixpanel method `track`:
* Click 'add’ when it looks like this... and then done
* Bind the trigger `page_view` (from the UDO `tealium_event`) *to* the mixpanel method `track`:
* Click 'add’ when it looks like this... and then done
 * You should now have this binding:
 This will track the UDO `page_view` wherever it appears on our site.
Next, give the event a name in mixpanel...
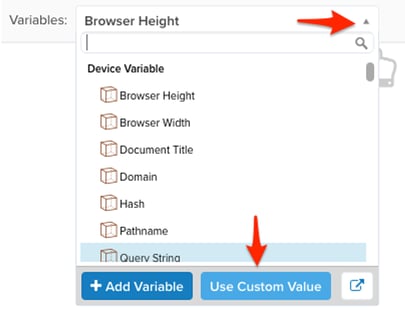
For this tutorial, we’ll use a **[custom value](https://docs.tealium.com/iq-tag-management/data-mappings/about/#custom-value-mapping)** ... this is added as another variable in tealium’s data mapper:
* Click "variables" drop down and choose use custom value:
This will track the UDO `page_view` wherever it appears on our site.
Next, give the event a name in mixpanel...
For this tutorial, we’ll use a **[custom value](https://docs.tealium.com/iq-tag-management/data-mappings/about/#custom-value-mapping)** ... this is added as another variable in tealium’s data mapper:
* Click "variables" drop down and choose use custom value:
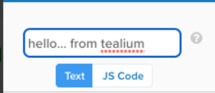
 * Define your "custom value"
 * Now, in the **event parameters** menu bind our custom value `hello... from tealium` to the `eventName` for `track`:
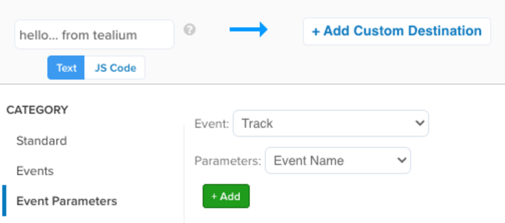 * Click "add" and "done" when you’ve mapped your custom value to Track : Event Name
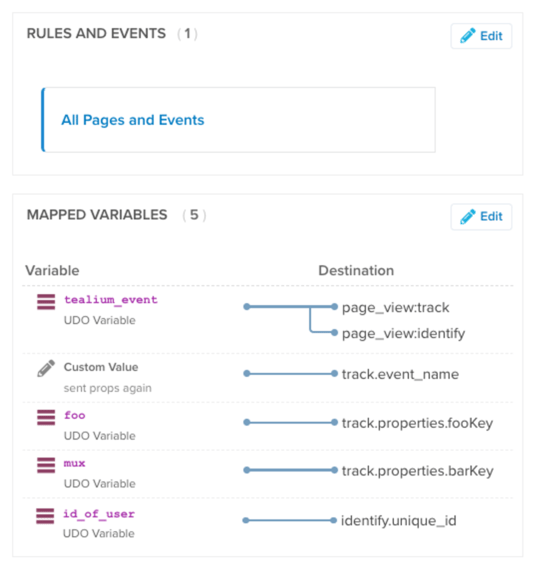
Our final mapping now looks like this:
* Click "add" and "done" when you’ve mapped your custom value to Track : Event Name
Our final mapping now looks like this:
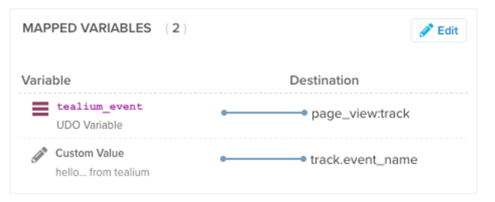 If your screen looks similar, you’re ready to save and publish!
 Wait a couple moments for tealium to apply the updates to your environment, and then load one of your pages (that has this tag deployed)
Pop open the developer console in your browser... you can see two requests to mixpanel:
Wait a couple moments for tealium to apply the updates to your environment, and then load one of your pages (that has this tag deployed)
Pop open the developer console in your browser... you can see two requests to mixpanel:
 If you’re using a [tealium browser extension debugger,](https://chrome.google.com/webstore/detail/tealium-tools/gidnphnamcemailggkemcgclnjeeokaa?hl=en-US) or have forced the utag into [debug mode by modifying the cookie](https://docs.tealium.com/platforms/javascript/debugging/#debug-mode):
```jsx theme={"system"}
document.cookie="utagdb=true";
```
You can see the tag’s rendering states:
If you’re using a [tealium browser extension debugger,](https://chrome.google.com/webstore/detail/tealium-tools/gidnphnamcemailggkemcgclnjeeokaa?hl=en-US) or have forced the utag into [debug mode by modifying the cookie](https://docs.tealium.com/platforms/javascript/debugging/#debug-mode):
```jsx theme={"system"}
document.cookie="utagdb=true";
```
You can see the tag’s rendering states:
 Or... you can skip all that debugging noise and just go to mixpanel, and click into the [events report](https://help.mixpanel.com/hc/en-us/articles/4402837164948-Events-formerly-Live-View-) to see your new fresh event!
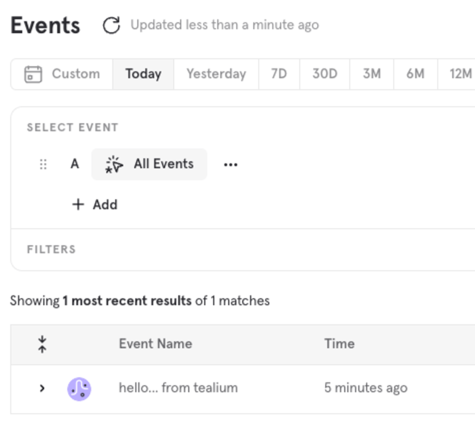 You just implemented Tealium → Mixpanel. You will repeat this process for additional events you wish to create.
## Adding Event Properties
Because Tealium wraps the Mixpanel JS SDK, Mixpanel's [default event properties](/docs/data-structure/property-reference#default-properties) will be including on every event.
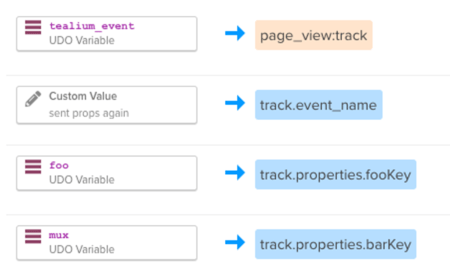
Any "custom" event properties will need to be mapped within Tealium using he following structure: **MY UDO ⇒** **`track.properties.KEY_NAME`** where `KEY_NAME` is the **label** you want to use for the **property key in mixpanel**... the **value** will be the value of the UDO at runtime:
You just implemented Tealium → Mixpanel. You will repeat this process for additional events you wish to create.
## Adding Event Properties
Because Tealium wraps the Mixpanel JS SDK, Mixpanel's [default event properties](/docs/data-structure/property-reference#default-properties) will be including on every event.
Any "custom" event properties will need to be mapped within Tealium using he following structure: **MY UDO ⇒** **`track.properties.KEY_NAME`** where `KEY_NAME` is the **label** you want to use for the **property key in mixpanel**... the **value** will be the value of the UDO at runtime:
 A single event may have many custom properties mapped; that might look like this:
 Adding event properties is as simple as modifying the existing mapping to an event, and saving and publishing. Once you trigger your new tag you will the correct UDO value *and* the label you specified in the mapper show up in mixpanel
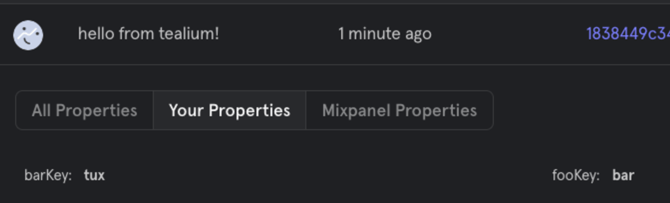 Note: you can always rename property keys' display labels [in lexicon](https://help.mixpanel.com/hc/en-us/articles/360001307806-Lexicon-Overview#adding-or-changing-descriptions)
## Identifying Users
**Important:** cross device tracking assumes you know the identity of the current user.. **`identify()`** should *only* be called on "authenticated" (logged in) pages/actions.
Ultimately, we are trying to get Tealium to render this tag:
```js theme={"system"}
mixpanel.identify(uniqueUserId)
```
Where `uniqueUserId` is a string value that refers to the canonical user id for the current ("logged in") user.
It’s critically important that this value uniquely identifies the end-user, across all devices they may have.
**Note:** some customer are tempted to use an email address as a unique identifier; this is (generally) not a good identifier, especially if users can change their email address... the value you pass to `identify` should never change for a single user.
* Assuming we have a UDO (or other javascript variable) that points to our UUID (unique user identifier)
Note: you can always rename property keys' display labels [in lexicon](https://help.mixpanel.com/hc/en-us/articles/360001307806-Lexicon-Overview#adding-or-changing-descriptions)
## Identifying Users
**Important:** cross device tracking assumes you know the identity of the current user.. **`identify()`** should *only* be called on "authenticated" (logged in) pages/actions.
Ultimately, we are trying to get Tealium to render this tag:
```js theme={"system"}
mixpanel.identify(uniqueUserId)
```
Where `uniqueUserId` is a string value that refers to the canonical user id for the current ("logged in") user.
It’s critically important that this value uniquely identifies the end-user, across all devices they may have.
**Note:** some customer are tempted to use an email address as a unique identifier; this is (generally) not a good identifier, especially if users can change their email address... the value you pass to `identify` should never change for a single user.
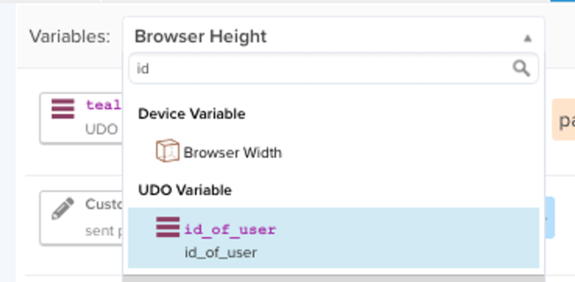
* Assuming we have a UDO (or other javascript variable) that points to our UUID (unique user identifier)
 * Next, instruct Tealium when to use our `identify` tag... this is similar to how we used `page_view:track` directive to tell tealium to call `.track()` on the "tealium event" "page\_view" ... you will probably use some other UDO event here (like `log in` or `sign in`):
 * Select the `id_of_user` UDO (or whatever value represents our UUID for the end user) in the dropdown and proceed to **SELECT DESTINATION**
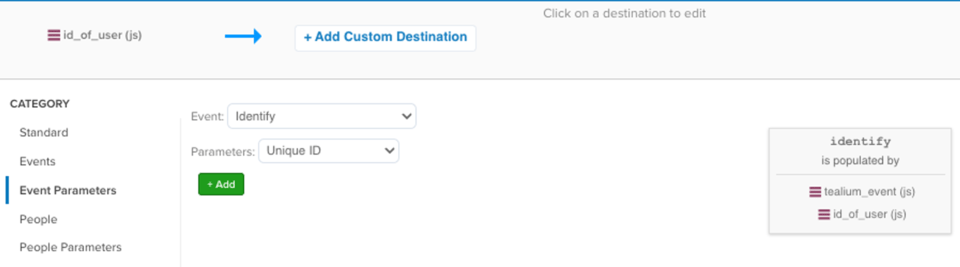
 * Finally, map the `id_of_user` value to `event parameters` for the `identify` event and choose the specific parameter `unique ID` ... then click **ADD**
 A final implementation of mixpanel within Tealium might look like this: