> ## Documentation Index
> Fetch the complete documentation index at: https://docs.mixpanel.com/llms.txt
> Use this file to discover all available pages before exploring further.
# Ad Spend
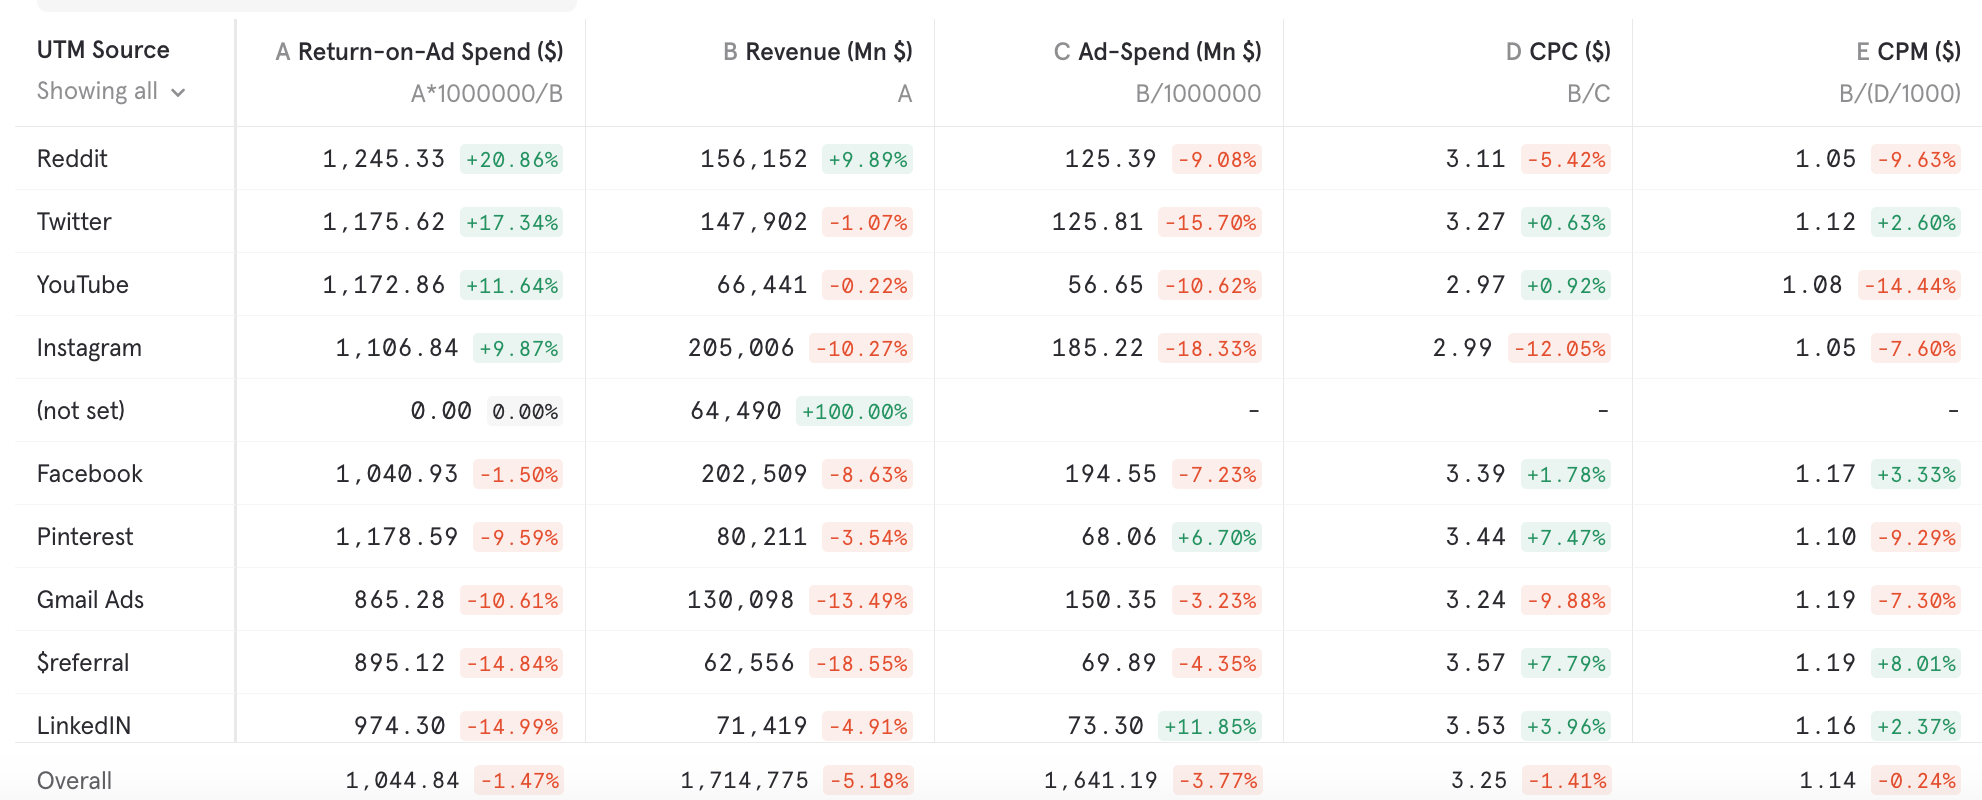
Mixpanel’s event-based data model enables you to represent and analyze any type of data, including ad campaign performance. This guide shows you how to track this data to Mixpanel. The end result is a report that looks like this.
In this doc, we give step-by-step guidance on how to bring your advertising network data into Mixpanel to look at metrics such as ROAS (Return on Ad Spend), CPC (Cost per click) in the context of in-product conversions. We also provide detailed guides for Google and Facebook Ads. The end result should look like this:
 **NOTE:** If you are a Marketer reading this, we encourage you to share this with your dev team to get this one-time setup done. This should not take more than a couple of hours.
If you prefer not to build and maintain your data pipelines, consider using [Vendo](/docs/tracking-methods/integrations/vendo). The Vendo integration with Mixpanel allows seamless integration of advertising data from Google, Meta, and other ad platforms into Mixpanel without the need for custom development. Learn more [here](https://www.vendodata.com/integrations/mixpanel).
## Importing via Warehouse Connectors
If your ad spend data is already in a data warehouse, you can bring it into Mixpanel using [Warehouse Connectors](/docs/tracking-methods/warehouse-connectors) — no custom code or cloud functions required.
### Using the Ad Spend Template
[Link to Demo](https://www.loom.com/share/69dbc98ffeca415aafb10ede7a52b925)
The Ad Spend template provides a streamlined setup for mapping your warehouse table to Mixpanel's ad spend data model.
1. Connect your warehouse in **Project Settings → Warehouse Sources**.
2. Select a table or view that contains your ad metrics and choose the **Ad Spend** template.
3. Map columns for required Mixpanel fields (event name, timestamp) and ad metrics like `cost`, `clicks`, and `impressions`.
4. Set a sync schedule (e.g. hourly or daily). Mixpanel will sync rows from your table and turn each one into an event you can analyze in Insights and other reports.
## Importing via APIs
The sections below walk through building custom API pipelines to pull data directly from ad networks and send it to Mixpanel. This approach gives you full control but requires writing and hosting code.
### Understanding the Data Model
Events are the core of Mixpanel's data model. Fundamentally, an event is a row of data with a name, a timestamp, and a set of properties. This is how we can represent Ad Data as events.
```jsx theme={"system"}
{
event: 'Ad Data',
properties: {
time: 1680307200000,
source: 'Google',
campaign_id: 12345,
// Cost of this campaign in USD for this day
cost: 37.19,
// The total clicks of this ad campaign for this day
clicks: 11,
// The total impressions of this ad campaign for this day
impressions: 482,
// metadata about the campaign; matches client side events
utm_source: "google",
utm_medium: "newsletter",
utm_campaign: "Launch Commercial US",
utm_content: "ad-text-or-variant",
utm_term: "ad-keywords"
}
}
```
The crux of this How To guide is turning the data exported by Ad Networks into events that look like the above.
**Best Practices**
* **Only include base metrics** cost, clicks, and impressions. We don’t need to send derived metrics like Cost-per-click, because Mixpanel’s [Custom Properties](/docs/features/custom-properties) and Formulas allow us to calculate and alter derived metrics on the fly.
* **Matching client side properties:** if you are using a Mixpanel client-side SDK to track user behaviors, you will want to model
additional campaign metadata (source, medium, campaign, etc...) as `utm_source`, `utm_medium` etc... this matches the way mixpanel's SDKs [capture UTM params by default](/docs/tracking-methods/sdks/javascript#tracking-utm-parameters)
* **No Distinct ID:** You’ll notice that our event has no Distinct ID. This is because ad performance data isn’t tied to any particular user. **This is the key difference from behavioral events.** By omitting it, we are ensuring that these events do not get erroneously included in reporting that intend to analyze user behavior such as Funnels, Retentions, Flows, unique user counts, “did not do” cohorts, etc.
* **Event properties are aggregated:** You’ll notice the Ad-Data event in this example is scheduled to trigger only once a day. Properties are aggregated counts of all clicks through the day, all impressions through the day, all ad-spend through the day. Reason for this is ad-networks only export data at an aggregate level (without user details) and at fixed intervals (lowest granularity is generally a day)
* **Include an Insert ID:** It’s recommended to include the Insert ID property for these kinds of events. This allows you to send the campaign data to Mixpanel more than once for a particular segment without duplicating the data in reports.
The Insert ID should be made up of unique attributes in the event that separate it from other performance data.
Using our above event example, the uniquely identifiable properties are:
* The ad network name
* The date of the performance data
* The campaign ID
If we were to send this data more than once to Mixpanel, we know that these 3 properties will always be constant. We can build an Insert ID from that information:
```jsx theme={"system"}
// "G" = Google Ads
// "2023-04-01" = The date of our data
// "12345" = The specific campaign ID
$insert_id = `G-2023-04-01-12345`;
```
Note: Keep in mind the [Insert ID length limitations](/reference/import-events#propertiesinsert_id). If your ad network has long campaign IDs or other unique properties to use, you should use MD5 or another hashing algorithm to shorten your Insert ID.
### Gathering Data from Ad Networks
Different ad networks provide different ways to access their raw data. Some allow you to manually download a CSV export that can be transformed into the above format and sent to Mixpanel. Most networks also have APIs that allow you to automate exporting the metrics that you’re interested in.
> 💡 Note: Some of these APIs require registration and permissions with the underlying platform, please read their docs to set this up.
* **Google Ads** provides a Reporting API that can be used to extract performance data: [https://developers.google.com/google-ads/api/docs/reporting/overview](https://developers.google.com/google-ads/api/docs/reporting/overview)
* Facebook provides a Marketing Insights API for ad performance metrics: [https://developers.facebook.com/docs/marketing-api/insights](https://developers.facebook.com/docs/marketing-api/insights)
* LinkedIn provides a Marketing Reporting API for ad performance data: [https://learn.microsoft.com/en-us/linkedin/marketing/integrations/ads-reporting/getting-started](https://learn.microsoft.com/en-us/linkedin/marketing/integrations/ads-reporting/getting-started)
* Twitter provides an Ads Analytics API that can be used to extract performance data: [https://developer.twitter.com/en/docs/twitter-ads-api/analytics/overview](https://developer.twitter.com/en/docs/twitter-ads-api/analytics/overview)
## Detailed Guides
Below are detailed guides for Google and Facebook Ad Networks. The same general process described in these two guides can be followed for any other ad network as well by using their export APIs and pushing the data to Mixpanel.
### Google
This guide will go through setting up a serverless Google Cloud Function that will export individual ad campaign performance data from Google Ads, transform them into Mixpanel events, and send them to your Mixpanel project every day.
#### Prerequisites
In order to follow this guide, you will need:
* Mixpanel project token (can be found in Mixpanel project settings)
* Mixpanel secret token (can be found in Mixpanel project settings)
* This is required to track back-dated events
* [Google Ads Developer Token](https://developers.google.com/google-ads/api/docs/first-call/dev-token)
* An account with [Google Ads](https://ads.google.com/) access to your ad campaigns
* A Google Cloud Platform project
#### Accessing Google Ads API
Our Google Cloud Function will use the [Google Ads API](https://developers.google.com/google-ads/api/docs/start) to extract relevant campaign performance data for the previous day. To access their API, we will need to create a new Google API Credential that has access to the Google Ads API.
##### Creating your Credentials
* In your Google Cloud Platform project, navigate to the [Credentials](https://console.cloud.google.com/apis/credentials) screen
* From the ************************************Create credentials************************************ dropdown, create a new ******************************OAuth client ID******************************
* For **********************************Application type**********************************, select ******************************Web application******************************
* Add an ************************************************Authorized redirect URIs************************************************ entry for `https://developers.google.com/oauthplayground`
* This is only for the next step and can be removed afterwards
* ************Create************ the credential
After creating your credential, it will show you its ********************Client ID******************** and **************************Client secret**************************. Take note of those as we will need them for the next step and to access the Google Ads API.
##### Enabling Google Ads API access
We need to allow our new credential to access the Google Ads API by enabling it.
* Navigate to the [Enabled APIs & services](https://console.cloud.google.com/apis/dashboard) page in Google Cloud
* Click ********************************************Enable APIs and services********************************************
* Find ****************************[Google Ads API](https://console.cloud.google.com/apis/library/googleads.googleapis.com)****************************, and press ************Enable************
##### Generating a Refresh Token
The credential you created allows Google to track access to the Google Ads API, but it doesn’t specify which Google user its acting on behalf of to retrieve the correct ad performance data. We will need to give the credential access to your Google Ads account so that it can export metrics on your behalf.
* Go to the [Google OAuth Playground](https://developers.google.com/oauthplayground#step1\&scopes=https%3A//www.googleapis.com/auth/adwords\&url=https%3A//\&content_type=application/json\&http_method=GET\&useDefaultOauthCred=checked\&oauthEndpointSelect=Google\&oauthAuthEndpointValue=https%3A//accounts.google.com/o/oauth2/v2/auth\&oauthTokenEndpointValue=https%3A//oauth2.googleapis.com/token\&includeCredentials=unchecked\&accessTokenType=bearer\&autoRefreshToken=unchecked\&accessType=offline\&forceAprovalPrompt=checked\&response_type=code)
* Click the Settings cog in the upper right corner
* Set **********************OAuth flow********************** to **********************Server-side**********************
* For **********************Access type**********************, select **************Offline**************
* This will ensure we get a refresh token, and not just a short-lived access token
* Check the ************************************************************Use your own OAuth credentials************************************************************ checkbox
* Fill in the ********************Client ID******************** and ****************************Client Secret**************************** from the credential that you created earlier
* In the left hand side, find ****************************Google Ads API****************************, and select it
Once you click the ******************************Authorize APIs****************************** button, it will ask you to sign in with your Google account. Make sure to sign in with the one that has access to your Google Ads account.
It will ask you to allow the credential to ****************************************************************Manage your Google Ads Campaigns****************************************************************. Click ************Accept************.
Once it generates an Authorization code, click the button that says **Exchange authorization code for tokens**.
Take note of the **************************Refresh token************************** that it generates, your function will need this to access the Google Ads API.
##### Get the customer client ID
The last piece of information we will need is the Client Customer ID. It is the ID of your Google Ads user account, which we will need to know where to pull campaign data from.
Log into [Google Ads](https://ads.google.com/), and note the numbers at the top right of the screen under your display name.
**NOTE:** If you are a Marketer reading this, we encourage you to share this with your dev team to get this one-time setup done. This should not take more than a couple of hours.
If you prefer not to build and maintain your data pipelines, consider using [Vendo](/docs/tracking-methods/integrations/vendo). The Vendo integration with Mixpanel allows seamless integration of advertising data from Google, Meta, and other ad platforms into Mixpanel without the need for custom development. Learn more [here](https://www.vendodata.com/integrations/mixpanel).
## Importing via Warehouse Connectors
If your ad spend data is already in a data warehouse, you can bring it into Mixpanel using [Warehouse Connectors](/docs/tracking-methods/warehouse-connectors) — no custom code or cloud functions required.
### Using the Ad Spend Template
[Link to Demo](https://www.loom.com/share/69dbc98ffeca415aafb10ede7a52b925)
The Ad Spend template provides a streamlined setup for mapping your warehouse table to Mixpanel's ad spend data model.
1. Connect your warehouse in **Project Settings → Warehouse Sources**.
2. Select a table or view that contains your ad metrics and choose the **Ad Spend** template.
3. Map columns for required Mixpanel fields (event name, timestamp) and ad metrics like `cost`, `clicks`, and `impressions`.
4. Set a sync schedule (e.g. hourly or daily). Mixpanel will sync rows from your table and turn each one into an event you can analyze in Insights and other reports.
## Importing via APIs
The sections below walk through building custom API pipelines to pull data directly from ad networks and send it to Mixpanel. This approach gives you full control but requires writing and hosting code.
### Understanding the Data Model
Events are the core of Mixpanel's data model. Fundamentally, an event is a row of data with a name, a timestamp, and a set of properties. This is how we can represent Ad Data as events.
```jsx theme={"system"}
{
event: 'Ad Data',
properties: {
time: 1680307200000,
source: 'Google',
campaign_id: 12345,
// Cost of this campaign in USD for this day
cost: 37.19,
// The total clicks of this ad campaign for this day
clicks: 11,
// The total impressions of this ad campaign for this day
impressions: 482,
// metadata about the campaign; matches client side events
utm_source: "google",
utm_medium: "newsletter",
utm_campaign: "Launch Commercial US",
utm_content: "ad-text-or-variant",
utm_term: "ad-keywords"
}
}
```
The crux of this How To guide is turning the data exported by Ad Networks into events that look like the above.
**Best Practices**
* **Only include base metrics** cost, clicks, and impressions. We don’t need to send derived metrics like Cost-per-click, because Mixpanel’s [Custom Properties](/docs/features/custom-properties) and Formulas allow us to calculate and alter derived metrics on the fly.
* **Matching client side properties:** if you are using a Mixpanel client-side SDK to track user behaviors, you will want to model
additional campaign metadata (source, medium, campaign, etc...) as `utm_source`, `utm_medium` etc... this matches the way mixpanel's SDKs [capture UTM params by default](/docs/tracking-methods/sdks/javascript#tracking-utm-parameters)
* **No Distinct ID:** You’ll notice that our event has no Distinct ID. This is because ad performance data isn’t tied to any particular user. **This is the key difference from behavioral events.** By omitting it, we are ensuring that these events do not get erroneously included in reporting that intend to analyze user behavior such as Funnels, Retentions, Flows, unique user counts, “did not do” cohorts, etc.
* **Event properties are aggregated:** You’ll notice the Ad-Data event in this example is scheduled to trigger only once a day. Properties are aggregated counts of all clicks through the day, all impressions through the day, all ad-spend through the day. Reason for this is ad-networks only export data at an aggregate level (without user details) and at fixed intervals (lowest granularity is generally a day)
* **Include an Insert ID:** It’s recommended to include the Insert ID property for these kinds of events. This allows you to send the campaign data to Mixpanel more than once for a particular segment without duplicating the data in reports.
The Insert ID should be made up of unique attributes in the event that separate it from other performance data.
Using our above event example, the uniquely identifiable properties are:
* The ad network name
* The date of the performance data
* The campaign ID
If we were to send this data more than once to Mixpanel, we know that these 3 properties will always be constant. We can build an Insert ID from that information:
```jsx theme={"system"}
// "G" = Google Ads
// "2023-04-01" = The date of our data
// "12345" = The specific campaign ID
$insert_id = `G-2023-04-01-12345`;
```
Note: Keep in mind the [Insert ID length limitations](/reference/import-events#propertiesinsert_id). If your ad network has long campaign IDs or other unique properties to use, you should use MD5 or another hashing algorithm to shorten your Insert ID.
### Gathering Data from Ad Networks
Different ad networks provide different ways to access their raw data. Some allow you to manually download a CSV export that can be transformed into the above format and sent to Mixpanel. Most networks also have APIs that allow you to automate exporting the metrics that you’re interested in.
> 💡 Note: Some of these APIs require registration and permissions with the underlying platform, please read their docs to set this up.
* **Google Ads** provides a Reporting API that can be used to extract performance data: [https://developers.google.com/google-ads/api/docs/reporting/overview](https://developers.google.com/google-ads/api/docs/reporting/overview)
* Facebook provides a Marketing Insights API for ad performance metrics: [https://developers.facebook.com/docs/marketing-api/insights](https://developers.facebook.com/docs/marketing-api/insights)
* LinkedIn provides a Marketing Reporting API for ad performance data: [https://learn.microsoft.com/en-us/linkedin/marketing/integrations/ads-reporting/getting-started](https://learn.microsoft.com/en-us/linkedin/marketing/integrations/ads-reporting/getting-started)
* Twitter provides an Ads Analytics API that can be used to extract performance data: [https://developer.twitter.com/en/docs/twitter-ads-api/analytics/overview](https://developer.twitter.com/en/docs/twitter-ads-api/analytics/overview)
## Detailed Guides
Below are detailed guides for Google and Facebook Ad Networks. The same general process described in these two guides can be followed for any other ad network as well by using their export APIs and pushing the data to Mixpanel.
### Google
This guide will go through setting up a serverless Google Cloud Function that will export individual ad campaign performance data from Google Ads, transform them into Mixpanel events, and send them to your Mixpanel project every day.
#### Prerequisites
In order to follow this guide, you will need:
* Mixpanel project token (can be found in Mixpanel project settings)
* Mixpanel secret token (can be found in Mixpanel project settings)
* This is required to track back-dated events
* [Google Ads Developer Token](https://developers.google.com/google-ads/api/docs/first-call/dev-token)
* An account with [Google Ads](https://ads.google.com/) access to your ad campaigns
* A Google Cloud Platform project
#### Accessing Google Ads API
Our Google Cloud Function will use the [Google Ads API](https://developers.google.com/google-ads/api/docs/start) to extract relevant campaign performance data for the previous day. To access their API, we will need to create a new Google API Credential that has access to the Google Ads API.
##### Creating your Credentials
* In your Google Cloud Platform project, navigate to the [Credentials](https://console.cloud.google.com/apis/credentials) screen
* From the ************************************Create credentials************************************ dropdown, create a new ******************************OAuth client ID******************************
* For **********************************Application type**********************************, select ******************************Web application******************************
* Add an ************************************************Authorized redirect URIs************************************************ entry for `https://developers.google.com/oauthplayground`
* This is only for the next step and can be removed afterwards
* ************Create************ the credential
After creating your credential, it will show you its ********************Client ID******************** and **************************Client secret**************************. Take note of those as we will need them for the next step and to access the Google Ads API.
##### Enabling Google Ads API access
We need to allow our new credential to access the Google Ads API by enabling it.
* Navigate to the [Enabled APIs & services](https://console.cloud.google.com/apis/dashboard) page in Google Cloud
* Click ********************************************Enable APIs and services********************************************
* Find ****************************[Google Ads API](https://console.cloud.google.com/apis/library/googleads.googleapis.com)****************************, and press ************Enable************
##### Generating a Refresh Token
The credential you created allows Google to track access to the Google Ads API, but it doesn’t specify which Google user its acting on behalf of to retrieve the correct ad performance data. We will need to give the credential access to your Google Ads account so that it can export metrics on your behalf.
* Go to the [Google OAuth Playground](https://developers.google.com/oauthplayground#step1\&scopes=https%3A//www.googleapis.com/auth/adwords\&url=https%3A//\&content_type=application/json\&http_method=GET\&useDefaultOauthCred=checked\&oauthEndpointSelect=Google\&oauthAuthEndpointValue=https%3A//accounts.google.com/o/oauth2/v2/auth\&oauthTokenEndpointValue=https%3A//oauth2.googleapis.com/token\&includeCredentials=unchecked\&accessTokenType=bearer\&autoRefreshToken=unchecked\&accessType=offline\&forceAprovalPrompt=checked\&response_type=code)
* Click the Settings cog in the upper right corner
* Set **********************OAuth flow********************** to **********************Server-side**********************
* For **********************Access type**********************, select **************Offline**************
* This will ensure we get a refresh token, and not just a short-lived access token
* Check the ************************************************************Use your own OAuth credentials************************************************************ checkbox
* Fill in the ********************Client ID******************** and ****************************Client Secret**************************** from the credential that you created earlier
* In the left hand side, find ****************************Google Ads API****************************, and select it
Once you click the ******************************Authorize APIs****************************** button, it will ask you to sign in with your Google account. Make sure to sign in with the one that has access to your Google Ads account.
It will ask you to allow the credential to ****************************************************************Manage your Google Ads Campaigns****************************************************************. Click ************Accept************.
Once it generates an Authorization code, click the button that says **Exchange authorization code for tokens**.
Take note of the **************************Refresh token************************** that it generates, your function will need this to access the Google Ads API.
##### Get the customer client ID
The last piece of information we will need is the Client Customer ID. It is the ID of your Google Ads user account, which we will need to know where to pull campaign data from.
Log into [Google Ads](https://ads.google.com/), and note the numbers at the top right of the screen under your display name.
 It should look something like: `123-456-7890`.
#### Creating the function
Now that we have all of the information we need, we can create our Google Cloud Function.
The function will run once a day, export the previous day’s campaign metrics, transform them into Mixpanel events, and import them our Mixpanel project.
* Go to the [Google Cloud Functions](https://console.cloud.google.com/functions/) page
* Click ******************************Create function******************************
* In the **********************Environment********************** dropdown, select **************2nd gen**************
* For ****************************Function name****************************, choose something informative like `mixpanel-ads-google`
* Open ********************************Runtime, build, connections and security settings******************************** and increase the **********************************Memory allocated********************************** and ********CPUs******** from the defaults
* Depending on your ad network volume, you might want to play with these settings to process all of your data. You can always change these after creation.
* Press ********Next********
* Select **********************Node.js 18********************** as the **************Runtime**************
* For ************************Entry point************************, set it to `handler`
We will need to specify the dependencies for the function to use. Open the Inline Editor for **************************package.json************************** by clicking on it in the left navigation, and replace the contents with this:
```json theme={"system"}
{
"dependencies": {
"@google-cloud/functions-framework": "^3.0.0",
"mixpanel": "^0.17.0",
"google-ads-api": "^13.0.0"
}
}
```
> 💡 Google doesn’t provide a first-party Ads API client for Node.js. The one we are using is third-party. More information can be found [here](https://www.npmjs.com/package/google-ads-api).
For the function’s code, select ****************index.js**************** in the file tree and replace its contents with this snippet:
```jsx theme={"system"}
const functions = require('@google-cloud/functions-framework');
const { GoogleAdsApi } = require('google-ads-api');
const Mixpanel = require('mixpanel');
// Configuration:
// It's recommended to pass these values through Environment Variables to your function via Secret Manager
const MIXPANEL_TOKEN = 'YOUR MIXPANEL TOKEN';
const MIXPANEL_SECRET = 'YOUR MIXPANEL SECRET';
// For US Data Residency (default):
const MIXPANEL_HOST = 'api.mixpanel.com';
// For EU Data Residency:
// const MIXPANEL_HOST = 'api-eu.mixpanel.com';
// For India Data Residency:
// const MIXPANEL_HOST = 'api-in.mixpanel.com';
const GOOGLE_CLIENT_ID = 'YOUR GOOGLE CREDENTIAL CLIENT ID';
const GOOGLE_CLIENT_SECRET = 'YOUR GOOGLE CREDENTIAL CLIENT SECRET';
const GOOGLE_CLIENT_REFRESH_TOKEN = 'YOUR REFRESH TOKEN FOR YOUR GOOGLE CREDENTIAL';
const GOOGLE_ADS_DEVELOPER_TOKEN = 'YOUR GOOGLE ADS DEVELOPER TOKEN';
const GOOGLE_ADS_CUSTOMER_ID = 'YOUR GOOGLE CUSTOMER CLIENT ID WITHOUT HYPHENS'; // ex. 1234567890
// End of Configuration
const mixpanel = Mixpanel.init(MIXPANEL_TOKEN, {host: MIXPANEL_HOST, secret: MIXPANEL_SECRET});
const client = new GoogleAdsApi({
client_id: GOOGLE_CLIENT_ID,
client_secret: GOOGLE_CLIENT_SECRET,
developer_token: GOOGLE_ADS_DEVELOPER_TOKEN
});
/**
* Gets campaign data from Google Ads.
*/
function fetchGoogleAdsCampaigns() {
const customer = client.Customer({
customer_id: GOOGLE_ADS_CUSTOMER_ID,
refresh_token: GOOGLE_CLIENT_REFRESH_TOKEN
});
// Find metrics for all Google Ads campaigns that ran yesterday
return customer.query(`
SELECT
segments.date,
campaign.id,
campaign.name,
metrics.cost_micros,
metrics.clicks,
metrics.impressions
FROM
campaign
WHERE
metrics.cost_micros > 0
AND
segments.date DURING YESTERDAY
`);
}
/**
* Turns a Google Ads campaign result into a Mixpanel event.
*/
function transformCampaignToEvent(campaign) {
return {
event: 'Ad Data',
properties: {
$insert_id: `G-${campaign.segments.date}-${campaign.campaign.id}`,
// We need to turn the date into a Unix timestamp
time: new Date(campaign.segments.date).getTime(),
source: 'Google',
campaign_id: campaign.campaign.id,
// metadata about the campaign; matches client side events
utm_source: "google",
utm_campaign: campaign.campaign.name,
// Google's cost metric is 1 millionth of the fundamental currency specified by your Ads Account.
cost: campaign.metrics.cost_micros / 1_000_000,
impressions: campaign.metrics.impressions,
clicks: campaign.metrics.clicks
}
};
}
/**
* Our function's handler.
*/
functions.http('handler', async (req, res) => {
try {
// Get the raw campaign metrics
const campaigns = await fetchGoogleAdsCampaigns();
// Transform our raw metrics into Mixpanel events
const events = campaigns.map(transformCampaignToEvent);
// send them to Mixpanel
mixpanel.import_batch(events, (err) => {
if (err) {
throw err;
}
res.status(200).send(`Imported ${events.length} events.`);
});
} catch (err) {
res.status(500).send(err);
}
});
```
Change the variables at the top of the snippet to use the information we collected earlier and press ************Deploy************.
After deployment, you will see a ******URL****** at the top of the **********************************Function details********************************** screen. Save that for the next step.
Your function is now ready! When it’s triggered, it will pull your Google Ad network data and send it to Mixpanel.
#### Schedule your function
We want the function to run by itself every day so we can regularly inspect the data in Mixpanel. We’ll do this by using Google Cloud Scheduler to run our Google Cloud Function every morning at 8 AM UTC.
* Navigate to the [Google Cloud Schedule](https://console.cloud.google.com/cloudscheduler) page in your project
* Click ********************Create job******************** at the top of the page
* For ********Name********, choose something descriptive such as `gcf-mixpanel-ads-google-daily`
* In ******Frequency******, put `0 8 * * *`
* This is a unix-cron expression that means to run every day at the 8th hour (8:00 AM)
* [Google Ads has a short delay](https://support.google.com/google-ads/answer/2544985?hl=en#:~:text=In%20most%20cases%2C%20your%20account%20statistics%20\(such%20as%20clicks%2C%20conversions%2C%20and%20impressions\)%20are%20delayed%20by%20less%20than%203%20hours) before metrics are available. Choosing a time sufficiently later than midnight ensures that the data will be ready for us to retrieve.
* Select ******************************************************************Coordinated Universal Time (UTC)****************************************************************** as the ****************Timezone****************
* This can also be your local time if you prefer
* Press ****************Continue****************
* Select **********HTTP********** as the **********************Target type**********************
* In ********URL********, paste the URL that you got from your Cloud Function
* Set the **********************HTTP method********************** to ******GET******
* In the **********************Auth header********************** dropdown, choose Add OIDC token
* Select the service account that has access to your Google Cloud Function in the Service account dropdown
* This gives Cloud Scheduler the access required to invoke your function on your behalf
* Press ************Create************ to create your new schedule
#### Wrapping up
That’s it! We’ve made a Google Cloud Function that syncs Google Ads data to Mixpanel every morning.
### Facebook
This guide will go through setting up a serverless Google Cloud Function that will export individual ad campaign performance data from Facebook, transform them into Mixpanel events, and send them to your Mixpanel project every day.
#### Prerequisites
We'll be using Facebook's [Marketing API](https://developers.facebook.com/docs/marketing-apis/get-started) to retrieve ad data from your ads account.
In order to follow this guide, you will need:
* Mixpanel project token (can be found in Mixpanel project settings)
* Mixpanel secret token (can be found in Mixpanel project settings)
* This is required to track back-dated events
* [Facebook App Access Token](https://developers.facebook.com/docs/facebook-login/guides/access-tokens#apptokens) with the `ads_read` permission
* Facebook Ad Account ID
* You can get this from the Ad account dropdown at the top of [Facebook Ads Manager](https://adsmanager.facebook.com/adsmanager/manage)
* A Google Cloud Platform project
#### Creating the function
The function will run once a day, export the previous day’s campaign metrics, transform them into Mixpanel events, and import them our Mixpanel project.
* Go to the [Google Cloud Functions](https://console.cloud.google.com/functions/) page
* Click ******************************Create function******************************
* In the **********************Environment********************** dropdown, select **************2nd gen**************
* For ****************************Function name****************************, choose something informative like `mixpanel-ads-facebook`
* Open ********************************Runtime, build, connections and security settings******************************** and increase the **********************************Memory allocated********************************** and ********CPUs******** from the defaults
* Depending on your ad network volume, you might want to play with these settings to process all of your data. You can always change these after creation.
* Press ********Next********
* Select **********************Node.js 18********************** as the **************Runtime**************
* For ************************Entry point************************, set it to `handler`
We will need to specify the dependencies for the function to use. Open the Inline Editor for **************************package.json************************** by clicking on it in the left navigation, and replace the contents with this:
```json theme={"system"}
{
"dependencies": {
"@google-cloud/functions-framework": "^3.0.0",
"mixpanel": "^0.17.0",
"facebook-nodejs-business-sdk": "^16.0.2"
}
}
```
For the function’s code, select ****************index.js**************** in the file tree and replace its contents with this snippet:
```jsx theme={"system"}
const functions = require('@google-cloud/functions-framework');
const adsSdk = require('facebook-nodejs-business-sdk');
const Mixpanel = require('mixpanel');
// Configuration:
// It's recommended to pass these values through Environment Variables to your function via Secret Manager
const MIXPANEL_TOKEN = 'YOUR MIXPANEL TOKEN';
const MIXPANEL_SECRET = 'YOUR MIXPANEL SECRET';
// For US Data Residency (default):
const MIXPANEL_HOST = 'api.mixpanel.com';
// For EU Data Residency:
// const MIXPANEL_HOST = 'api-eu.mixpanel.com';
// For India Data Residency:
// const MIXPANEL_HOST = 'api-in.mixpanel.com';
const FACEBOOK_TOKEN = 'YOUR FACEBOOK DEVELOPER APP TOKEN';
const FACEBOOK_AD_ACCOUNT_ID = 123456789012345; // Your Facebook Ad account ID here. e.g. 123456789012345
const FACEBOOK_AD_API_ACCOUNT = 'act_' + FACEBOOK_AD_ACCOUNT_ID;
// End of Configuration
const mixpanel = Mixpanel.init(MIXPANEL_TOKEN, {
host: MIXPANEL_HOST,
secret: MIXPANEL_SECRET
});
adsSdk.FacebookAdsApi.init(FACEBOOK_TOKEN);
/**
* Gets campaign data from Facebook.
*/
function fetchFacebookCampaigns() {
const account = new adsSdk.AdAccount(FACEBOOK_AD_API_ACCOUNT);
// Find metrics for all Facebook Ads campaigns that ran yesterday
return account.getInsights([
'campaign_id',
'campaign_name',
'spend',
'impressions',
'clicks'
], {
level: 'campaign',
date_preset: 'yesterday',
filtering: [
{
field: 'spend',
operator: 'GREATER_THAN',
value: 0
}
]
});
}
/**
* Turns a Facebook campaign result into a Mixpanel event.
*/
function transformCampaignToEvent(campaign) {
return {
event: 'Ad Data',
properties: {
$insert_id: `FB-${campaign.date_start}-${campaign.campaign_id}`,
time: new Date(campaign.date_start).getTime(),
source: 'Facebook',
campaign_id: campaign.campaign_id,
// metadata about the campaign; matches client side events
utm_source: "facebook",
utm_campaign: campaign.campaign_name,
cost: campaign.spend,
impressions: campaign.impressions,
clicks: campaign.clicks
}
};
}
/**
* Our function's handler.
*/
functions.http('handler', async (req, res) => {
try {
// Get the raw campaign metrics
const campaigns = await fetchFacebookCampaigns();
// Transform our raw metrics into Mixpanel events
const events = campaigns.map(transformCampaignToEvent);
// send them to Mixpanel
mixpanel.import_batch(events, (err) => {
if (err) {
throw err;
}
res.status(200).send(`Imported ${events.length} events.`);
});
} catch (err) {
res.status(500).send(err);
}
});
```
Change the variables at the top of the snippet to use the information we collected earlier and press ************Deploy************.
After deployment, you will see a ******URL****** at the top of the **********************************Function details********************************** screen. Save that for the next step.
Your function is now ready! When it’s triggered, it will pull your Facebook Ad network data and send it to Mixpanel.
#### Schedule your function
We want the function to run by itself every day so we can regularly inspect the data in Mixpanel. We’ll do this by using Google Cloud Scheduler to run our Google Cloud Function every morning at 8 AM UTC.
* Navigate to the [Google Cloud Schedule](https://console.cloud.google.com/cloudscheduler) page in your project
* Click ********************Create job******************** at the top of the page
* For ********Name********, choose something descriptive such as `gcf-mixpanel-ads-facebook-daily`
* In ******Frequency******, put `0 8 * * *`
* This is a unix-cron expression that means to run every day at the 8th hour (8:00 AM)
* Some ad networks may have a delay before metrics are available. Choosing a time sufficiently later than midnight ensures that the data will be ready for us to retrieve.
* Select ******************************************************************Coordinated Universal Time (UTC)****************************************************************** as the ****************Timezone****************
* This can also be your local time if you prefer
* Press ****************Continue****************
* Select **********HTTP********** as the **********************Target type**********************
* In ********URL********, paste the URL that you got from your Cloud Function
* Set the **********************HTTP method********************** to ******GET******
* In the **********************Auth header********************** dropdown, choose Add OIDC token
* Select the service account that has access to your Google Cloud Function in the Service account dropdown
* This gives Cloud Scheduler the access required to invoke your function on your behalf
* Press ************Create************ to create your new schedule
#### Wrapping up
That’s it! We’ve made a Google Cloud Function that syncs Facebook Ads data to Mixpanel every morning.
It should look something like: `123-456-7890`.
#### Creating the function
Now that we have all of the information we need, we can create our Google Cloud Function.
The function will run once a day, export the previous day’s campaign metrics, transform them into Mixpanel events, and import them our Mixpanel project.
* Go to the [Google Cloud Functions](https://console.cloud.google.com/functions/) page
* Click ******************************Create function******************************
* In the **********************Environment********************** dropdown, select **************2nd gen**************
* For ****************************Function name****************************, choose something informative like `mixpanel-ads-google`
* Open ********************************Runtime, build, connections and security settings******************************** and increase the **********************************Memory allocated********************************** and ********CPUs******** from the defaults
* Depending on your ad network volume, you might want to play with these settings to process all of your data. You can always change these after creation.
* Press ********Next********
* Select **********************Node.js 18********************** as the **************Runtime**************
* For ************************Entry point************************, set it to `handler`
We will need to specify the dependencies for the function to use. Open the Inline Editor for **************************package.json************************** by clicking on it in the left navigation, and replace the contents with this:
```json theme={"system"}
{
"dependencies": {
"@google-cloud/functions-framework": "^3.0.0",
"mixpanel": "^0.17.0",
"google-ads-api": "^13.0.0"
}
}
```
> 💡 Google doesn’t provide a first-party Ads API client for Node.js. The one we are using is third-party. More information can be found [here](https://www.npmjs.com/package/google-ads-api).
For the function’s code, select ****************index.js**************** in the file tree and replace its contents with this snippet:
```jsx theme={"system"}
const functions = require('@google-cloud/functions-framework');
const { GoogleAdsApi } = require('google-ads-api');
const Mixpanel = require('mixpanel');
// Configuration:
// It's recommended to pass these values through Environment Variables to your function via Secret Manager
const MIXPANEL_TOKEN = 'YOUR MIXPANEL TOKEN';
const MIXPANEL_SECRET = 'YOUR MIXPANEL SECRET';
// For US Data Residency (default):
const MIXPANEL_HOST = 'api.mixpanel.com';
// For EU Data Residency:
// const MIXPANEL_HOST = 'api-eu.mixpanel.com';
// For India Data Residency:
// const MIXPANEL_HOST = 'api-in.mixpanel.com';
const GOOGLE_CLIENT_ID = 'YOUR GOOGLE CREDENTIAL CLIENT ID';
const GOOGLE_CLIENT_SECRET = 'YOUR GOOGLE CREDENTIAL CLIENT SECRET';
const GOOGLE_CLIENT_REFRESH_TOKEN = 'YOUR REFRESH TOKEN FOR YOUR GOOGLE CREDENTIAL';
const GOOGLE_ADS_DEVELOPER_TOKEN = 'YOUR GOOGLE ADS DEVELOPER TOKEN';
const GOOGLE_ADS_CUSTOMER_ID = 'YOUR GOOGLE CUSTOMER CLIENT ID WITHOUT HYPHENS'; // ex. 1234567890
// End of Configuration
const mixpanel = Mixpanel.init(MIXPANEL_TOKEN, {host: MIXPANEL_HOST, secret: MIXPANEL_SECRET});
const client = new GoogleAdsApi({
client_id: GOOGLE_CLIENT_ID,
client_secret: GOOGLE_CLIENT_SECRET,
developer_token: GOOGLE_ADS_DEVELOPER_TOKEN
});
/**
* Gets campaign data from Google Ads.
*/
function fetchGoogleAdsCampaigns() {
const customer = client.Customer({
customer_id: GOOGLE_ADS_CUSTOMER_ID,
refresh_token: GOOGLE_CLIENT_REFRESH_TOKEN
});
// Find metrics for all Google Ads campaigns that ran yesterday
return customer.query(`
SELECT
segments.date,
campaign.id,
campaign.name,
metrics.cost_micros,
metrics.clicks,
metrics.impressions
FROM
campaign
WHERE
metrics.cost_micros > 0
AND
segments.date DURING YESTERDAY
`);
}
/**
* Turns a Google Ads campaign result into a Mixpanel event.
*/
function transformCampaignToEvent(campaign) {
return {
event: 'Ad Data',
properties: {
$insert_id: `G-${campaign.segments.date}-${campaign.campaign.id}`,
// We need to turn the date into a Unix timestamp
time: new Date(campaign.segments.date).getTime(),
source: 'Google',
campaign_id: campaign.campaign.id,
// metadata about the campaign; matches client side events
utm_source: "google",
utm_campaign: campaign.campaign.name,
// Google's cost metric is 1 millionth of the fundamental currency specified by your Ads Account.
cost: campaign.metrics.cost_micros / 1_000_000,
impressions: campaign.metrics.impressions,
clicks: campaign.metrics.clicks
}
};
}
/**
* Our function's handler.
*/
functions.http('handler', async (req, res) => {
try {
// Get the raw campaign metrics
const campaigns = await fetchGoogleAdsCampaigns();
// Transform our raw metrics into Mixpanel events
const events = campaigns.map(transformCampaignToEvent);
// send them to Mixpanel
mixpanel.import_batch(events, (err) => {
if (err) {
throw err;
}
res.status(200).send(`Imported ${events.length} events.`);
});
} catch (err) {
res.status(500).send(err);
}
});
```
Change the variables at the top of the snippet to use the information we collected earlier and press ************Deploy************.
After deployment, you will see a ******URL****** at the top of the **********************************Function details********************************** screen. Save that for the next step.
Your function is now ready! When it’s triggered, it will pull your Google Ad network data and send it to Mixpanel.
#### Schedule your function
We want the function to run by itself every day so we can regularly inspect the data in Mixpanel. We’ll do this by using Google Cloud Scheduler to run our Google Cloud Function every morning at 8 AM UTC.
* Navigate to the [Google Cloud Schedule](https://console.cloud.google.com/cloudscheduler) page in your project
* Click ********************Create job******************** at the top of the page
* For ********Name********, choose something descriptive such as `gcf-mixpanel-ads-google-daily`
* In ******Frequency******, put `0 8 * * *`
* This is a unix-cron expression that means to run every day at the 8th hour (8:00 AM)
* [Google Ads has a short delay](https://support.google.com/google-ads/answer/2544985?hl=en#:~:text=In%20most%20cases%2C%20your%20account%20statistics%20\(such%20as%20clicks%2C%20conversions%2C%20and%20impressions\)%20are%20delayed%20by%20less%20than%203%20hours) before metrics are available. Choosing a time sufficiently later than midnight ensures that the data will be ready for us to retrieve.
* Select ******************************************************************Coordinated Universal Time (UTC)****************************************************************** as the ****************Timezone****************
* This can also be your local time if you prefer
* Press ****************Continue****************
* Select **********HTTP********** as the **********************Target type**********************
* In ********URL********, paste the URL that you got from your Cloud Function
* Set the **********************HTTP method********************** to ******GET******
* In the **********************Auth header********************** dropdown, choose Add OIDC token
* Select the service account that has access to your Google Cloud Function in the Service account dropdown
* This gives Cloud Scheduler the access required to invoke your function on your behalf
* Press ************Create************ to create your new schedule
#### Wrapping up
That’s it! We’ve made a Google Cloud Function that syncs Google Ads data to Mixpanel every morning.
### Facebook
This guide will go through setting up a serverless Google Cloud Function that will export individual ad campaign performance data from Facebook, transform them into Mixpanel events, and send them to your Mixpanel project every day.
#### Prerequisites
We'll be using Facebook's [Marketing API](https://developers.facebook.com/docs/marketing-apis/get-started) to retrieve ad data from your ads account.
In order to follow this guide, you will need:
* Mixpanel project token (can be found in Mixpanel project settings)
* Mixpanel secret token (can be found in Mixpanel project settings)
* This is required to track back-dated events
* [Facebook App Access Token](https://developers.facebook.com/docs/facebook-login/guides/access-tokens#apptokens) with the `ads_read` permission
* Facebook Ad Account ID
* You can get this from the Ad account dropdown at the top of [Facebook Ads Manager](https://adsmanager.facebook.com/adsmanager/manage)
* A Google Cloud Platform project
#### Creating the function
The function will run once a day, export the previous day’s campaign metrics, transform them into Mixpanel events, and import them our Mixpanel project.
* Go to the [Google Cloud Functions](https://console.cloud.google.com/functions/) page
* Click ******************************Create function******************************
* In the **********************Environment********************** dropdown, select **************2nd gen**************
* For ****************************Function name****************************, choose something informative like `mixpanel-ads-facebook`
* Open ********************************Runtime, build, connections and security settings******************************** and increase the **********************************Memory allocated********************************** and ********CPUs******** from the defaults
* Depending on your ad network volume, you might want to play with these settings to process all of your data. You can always change these after creation.
* Press ********Next********
* Select **********************Node.js 18********************** as the **************Runtime**************
* For ************************Entry point************************, set it to `handler`
We will need to specify the dependencies for the function to use. Open the Inline Editor for **************************package.json************************** by clicking on it in the left navigation, and replace the contents with this:
```json theme={"system"}
{
"dependencies": {
"@google-cloud/functions-framework": "^3.0.0",
"mixpanel": "^0.17.0",
"facebook-nodejs-business-sdk": "^16.0.2"
}
}
```
For the function’s code, select ****************index.js**************** in the file tree and replace its contents with this snippet:
```jsx theme={"system"}
const functions = require('@google-cloud/functions-framework');
const adsSdk = require('facebook-nodejs-business-sdk');
const Mixpanel = require('mixpanel');
// Configuration:
// It's recommended to pass these values through Environment Variables to your function via Secret Manager
const MIXPANEL_TOKEN = 'YOUR MIXPANEL TOKEN';
const MIXPANEL_SECRET = 'YOUR MIXPANEL SECRET';
// For US Data Residency (default):
const MIXPANEL_HOST = 'api.mixpanel.com';
// For EU Data Residency:
// const MIXPANEL_HOST = 'api-eu.mixpanel.com';
// For India Data Residency:
// const MIXPANEL_HOST = 'api-in.mixpanel.com';
const FACEBOOK_TOKEN = 'YOUR FACEBOOK DEVELOPER APP TOKEN';
const FACEBOOK_AD_ACCOUNT_ID = 123456789012345; // Your Facebook Ad account ID here. e.g. 123456789012345
const FACEBOOK_AD_API_ACCOUNT = 'act_' + FACEBOOK_AD_ACCOUNT_ID;
// End of Configuration
const mixpanel = Mixpanel.init(MIXPANEL_TOKEN, {
host: MIXPANEL_HOST,
secret: MIXPANEL_SECRET
});
adsSdk.FacebookAdsApi.init(FACEBOOK_TOKEN);
/**
* Gets campaign data from Facebook.
*/
function fetchFacebookCampaigns() {
const account = new adsSdk.AdAccount(FACEBOOK_AD_API_ACCOUNT);
// Find metrics for all Facebook Ads campaigns that ran yesterday
return account.getInsights([
'campaign_id',
'campaign_name',
'spend',
'impressions',
'clicks'
], {
level: 'campaign',
date_preset: 'yesterday',
filtering: [
{
field: 'spend',
operator: 'GREATER_THAN',
value: 0
}
]
});
}
/**
* Turns a Facebook campaign result into a Mixpanel event.
*/
function transformCampaignToEvent(campaign) {
return {
event: 'Ad Data',
properties: {
$insert_id: `FB-${campaign.date_start}-${campaign.campaign_id}`,
time: new Date(campaign.date_start).getTime(),
source: 'Facebook',
campaign_id: campaign.campaign_id,
// metadata about the campaign; matches client side events
utm_source: "facebook",
utm_campaign: campaign.campaign_name,
cost: campaign.spend,
impressions: campaign.impressions,
clicks: campaign.clicks
}
};
}
/**
* Our function's handler.
*/
functions.http('handler', async (req, res) => {
try {
// Get the raw campaign metrics
const campaigns = await fetchFacebookCampaigns();
// Transform our raw metrics into Mixpanel events
const events = campaigns.map(transformCampaignToEvent);
// send them to Mixpanel
mixpanel.import_batch(events, (err) => {
if (err) {
throw err;
}
res.status(200).send(`Imported ${events.length} events.`);
});
} catch (err) {
res.status(500).send(err);
}
});
```
Change the variables at the top of the snippet to use the information we collected earlier and press ************Deploy************.
After deployment, you will see a ******URL****** at the top of the **********************************Function details********************************** screen. Save that for the next step.
Your function is now ready! When it’s triggered, it will pull your Facebook Ad network data and send it to Mixpanel.
#### Schedule your function
We want the function to run by itself every day so we can regularly inspect the data in Mixpanel. We’ll do this by using Google Cloud Scheduler to run our Google Cloud Function every morning at 8 AM UTC.
* Navigate to the [Google Cloud Schedule](https://console.cloud.google.com/cloudscheduler) page in your project
* Click ********************Create job******************** at the top of the page
* For ********Name********, choose something descriptive such as `gcf-mixpanel-ads-facebook-daily`
* In ******Frequency******, put `0 8 * * *`
* This is a unix-cron expression that means to run every day at the 8th hour (8:00 AM)
* Some ad networks may have a delay before metrics are available. Choosing a time sufficiently later than midnight ensures that the data will be ready for us to retrieve.
* Select ******************************************************************Coordinated Universal Time (UTC)****************************************************************** as the ****************Timezone****************
* This can also be your local time if you prefer
* Press ****************Continue****************
* Select **********HTTP********** as the **********************Target type**********************
* In ********URL********, paste the URL that you got from your Cloud Function
* Set the **********************HTTP method********************** to ******GET******
* In the **********************Auth header********************** dropdown, choose Add OIDC token
* Select the service account that has access to your Google Cloud Function in the Service account dropdown
* This gives Cloud Scheduler the access required to invoke your function on your behalf
* Press ************Create************ to create your new schedule
#### Wrapping up
That’s it! We’ve made a Google Cloud Function that syncs Facebook Ads data to Mixpanel every morning.