> ## Documentation Index
> Fetch the complete documentation index at: https://docs.mixpanel.com/llms.txt
> Use this file to discover all available pages before exploring further.
# Install Mixpanel
export const ExtendedButton = ({title, link}) =>
{title}
;
## Overview
Installing Mixpanel is easy. This guide will show you how to do it with our SDKs.
Already collect product data? Connect your
**[Data Warehouse](/docs/tracking-methods/warehouse-connectors)** or via
**[3rd Party Integrations](/docs/tracking-methods/integrations/)**.
## Code
Choose from the methods below. Not sure how to choose? [Read our guide](/docs/tracking-methods/choosing-the-right-method).
##### Install the SDK
```html theme={"system"}
```
```text theme={"system"}
npm install --save mixpanel-browser
```
```text theme={"system"}
yarn add mixpanel-browser
```
##### Configure the SDK
Replace `YOUR_TOKEN` with your project token. You can find your token [here](https://mixpanel.com/settings/project).
You can learn more about configuring Session Replay and Heatmaps [here](/docs/tracking-methods/sdks/javascript/javascript-replay).
```js Javascript theme={"system"}
//Import Mixpanel SDK (only required for npm and yarn)
import mixpanel from "mixpanel-browser";
// Near entry of your product, init Mixpanel
mixpanel.init("YOUR_TOKEN", {
debug: true,
track_pageview: true,
persistence: "localStorage",
record_sessions_percent: 100, //records 100% of all sessions
record_heatmap_data: true,
});
```
##### Install the SDK
```shell Python theme={"system"}
pip install mixpanel
```
##### Configure the SDK
Replace `YOUR_TOKEN` with your project token. You can find your token [here](https://mixpanel.com/settings/project).
```python Python theme={"system"}
from mixpanel import Mixpanel
mp = Mixpanel("YOUR_TOKEN")
```
##### Install the SDK
**Install with Composer**
1. Add mixpanel/mixpanel-php as a dependency and run composer update:
```shell php theme={"system"}
"require": {
...
"mixpanel/mixpanel-php" : "2.*"
...
}
```
**Install Manually**
1. [Download the Mixpanel PHP Library](https://github.com/mixpanel/mixpanel-php/archive/master.zip)
2. Extract the zip file to a directory called "mixpanel-php" in your project root
##### Configure the SDK
Replace `YOUR_TOKEN` with your project token. You can find your token [here](https://mixpanel.com/settings/project).
```shell php theme={"system"}
```
##### Install the SDK
```shell Node.js theme={"system"}
npm install mixpanel
```
##### Configure the SDK
Replace `YOUR_TOKEN` with your project token. You can find your token [here](https://mixpanel.com/settings/project).
```js Node.js theme={"system"}
// Grab the Mixpanel factory
var Mixpanel = require("mixpanel");
// Create an instance of the mixpanel client
var mixpanel = Mixpanel.init("YOUR_TOKEN");
```
##### Install the SDK
```shell Go theme={"system"}
go get github.com/mixpanel/mixpanel-go
```
##### Configure the SDK
Replace `YOUR_TOKEN` with your project token. You can find your token [here](https://mixpanel.com/settings/project).
```shell Go theme={"system"}
package main
import (
"context"
"github.com/mixpanel/mixpanel-go"
)
func main() {
ctx := context.Background()
mp := mixpanel.NewApiClient("YOUR_TOKEN")
}
```
##### Install the SDK
```shell Ruby theme={"system"}
gem install mixpanel-ruby
```
##### Configure the SDK
Replace `YOUR_TOKEN` with your project token. You can find your token [here](https://mixpanel.com/settings/project).
```ruby Ruby theme={"system"}
require 'mixpanel-ruby'
mp = Mixpanel::Tracker.new(YOUR_TOKEN)
```
##### Install the SDK
```xml Java theme={"system"}
com.mixpanelmixpanel-java1.4.4
```
##### Configure the SDK
Replace `YOUR_TOKEN` with your project token. You can find your token [here](https://mixpanel.com/settings/project).
```java Java theme={"system"}
//Import Mixpanel API
import com.mixpanel.mixpanelapi.MessageBuilder;
import com.mixpanel.mixpanelapi.MixpanelAPI;
// Set up an instance of MixpanelAPI
MixpanelAPI mixpanel = new MixpanelAPI();
MessageBuilder messageBuilder = new MessageBuilder('YOUR_TOKEN');
```
##### Install the SDK
Under your app's root directory, run:
```sh theme={"system"}
npm install mixpanel-react-native
```
Under your application's iOS folder, run:
```sh theme={"system"}
pod install
```
Note: For XCode 12.5+, there is a known compile issue, please refer to this [workaround](https://github.com/mixpanel/mixpanel-react-native/issues/43#issuecomment-829599732).
##### Configure the SDK
Replace `YOUR_TOKEN` with your project token. You can find your token [here](https://mixpanel.com/settings/project).
```javascript theme={"system"}
//Import Mixpanel API
import { Mixpanel } from "mixpanel-react-native";
// Set up an instance of Mixpanel
const trackAutomaticEvents = false;
const mixpanel = new Mixpanel("YOUR_TOKEN", trackAutomaticEvents);
mixpanel.init();
```
##### Install the SDK
Add `mixpanel_flutter: ^2.0.0` to your package's pubspec.yaml file and run:
```sh theme={"system"}
flutter pub get
```
##### Configure the SDK
Replace `YOUR_TOKEN` with your project token. You can find your token [here](https://mixpanel.com/settings/project).
```dart theme={"system"}
import 'package:mixpanel_flutter/mixpanel_flutter.dart';
class _YourClassState extends State {
Mixpanel mixpanel;
@override
void initState() {
super.initState();
initMixpanel();
}
Future initMixpanel() async {
// Once you've called this method once, you can access `mixpanel` throughout the rest of your application.
mixpanel = await Mixpanel.init("YOUR_TOKEN", trackAutomaticEvents: false);
}
}
```
##### Install the SDK
Note: Swift Package Manager requires Xcode 12+ 1. In Xcode, select File >
Swift Packages > Add Package Dependency. 2. Follow the prompts using the URL
for this repository and must select a version greater than or equal to v4.0.0
1. Create a Podfile in your Xcode project directory by running `pod init` in
your terminal, edit the Podfile generated, and add the following line: `pod
'Mixpanel'`. 2. Run `pod install` in your Xcode project directory. CocoaPods
should download and install the Mixpanel library, and create a new Xcode
workspace. Open up this workspace in Xcode or typing `open *.xcworkspace` in
your terminal.
Add `github "mixpanel/mixpanel-iphone"` to your Cartfile.
##### Configure the SDK
Replace `YOUR_TOKEN` with your project token. You can find your token [here](https://mixpanel.com/settings/project).
```objc theme={"system"}
#import "Mixpanel/Mixpanel.h"
- (BOOL)application:(UIApplication _)application
didFinishLaunchingWithOptions:(NSDictionary _)launchOptions {
...
Mixpanel \*mixpanel = [Mixpanel sharedInstanceWithToken:@"YOUR_TOKEN"
trackAutomaticEvents: NO];
...
}
```
##### Install the SDK
Note: Swift Package Manager requires Xcode 12+
1. In Xcode, select File > Swift Packages > Add Package Dependency.
2. Paste the URL `https://github.com/mixpanel/mixpanel-swift` and a minimum semantic version of v2.8.0.
1. Create a Podfile in your Xcode project directory by running `pod init` in your terminal, edit the Podfile generated, and add the following line: `pod 'Mixpanel-swift'`.
2. Run `pod install` in your Xcode project directory. CocoaPods should download and install the Mixpanel library, and create a new Xcode workspace. Open up this workspace in Xcode or typing `open *.xcworkspace` in your terminal.
Add `github "mixpanel/mixpanel-swift"` to your Cartfile.
##### Configure the SDK
1. Import Mixpanel into `AppDelegate.swift`
2. Initialize Mixpanel within `application:didFinishLaunchingWithOptions` as seen below
Replace `YOUR_TOKEN` with your project token. You can find your token [here](https://mixpanel.com/settings/project).
```swift theme={"system"}
import Mixpanel
func application(_ application: UIApplication,
didFinishLaunchingWithOptions launchOptions: [NSObject: AnyObject]?) -> Bool {
...
// Replace with your Project Token
Mixpanel.initialize(token: "YOUR_TOKEN", trackAutomaticEvents: false)
...
}
```
##### Install the SDK
Add `implementation 'com.mixpanel.android:mixpanel-android:7.+'` as a dependency to your `build.gradle` file.
Once you've updated `build.gradle`, you can force Android Studio to sync with your new configuration by clicking the Sync Project with Gradle Files icon at the top of the window:

If it cannot find the dependency, you should make sure you've specified `mavenCentral()` as a repository in `build.gradle`.
Next, add the following permissions in your AndroidManifest.xml:
```java theme={"system"}
```
##### Configure the SDK
Replace `YOUR_TOKEN` with your project token. You can find your token [here](https://mixpanel.com/settings/project).
```java theme={"system"}
import com.mixpanel.android.mpmetrics.MixpanelAPI;
public class MainActivity extends ActionBarActivity {
private MixpanelAPI mp;
@Override
protected void onCreate(Bundle savedInstanceState) {
super.onCreate(savedInstanceState);
setContentView(R.layout.activity_main);
trackAutomaticEvents = false;
// Replace with your Project Token
mp = MixpanelAPI.getInstance(this, "YOUR_TOKEN", trackAutomaticEvents);
}
}
```
##### Install the SDK
Add `https://github.com/mixpanel/mixpanel-unity.git#master` to the dependencies section of `com.mixpanel.unity`.
Alternatively, you can download and install the .unitypackage file from our [releases page](https://github.com/mixpanel/mixpanel-unity/releases).
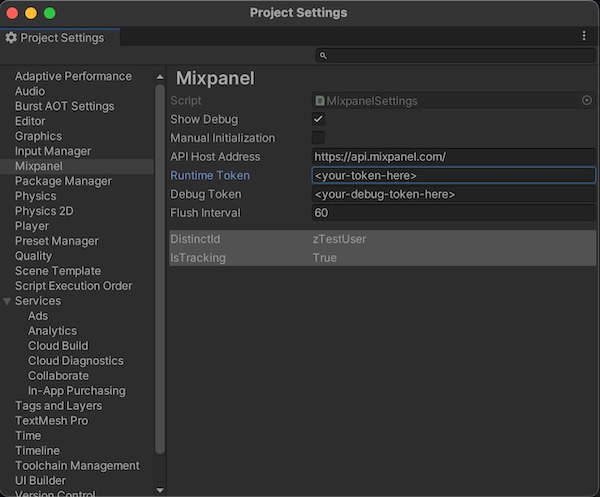
##### Configure the SDK
To initialize the library, first open the unity project settings menu for Mixpanel. (Edit -> Project Settings -> Mixpanel)
Then, enter your project token into the Token and Debug Token input fields within the inspector.
You can find your token [here](https://mixpanel.com/settings/project).
Note: If you prefer to initialize Mixpanel manually, you can select the `Manual Initialization` in the settings and
call `Mixpanel.Init()` to initialize.
To use mixpanel, add the following sample code to a part of your application:
```csharp theme={"system"}
using mixpanel;
```
You're
##### Install the SDK
No install required
Using the HTTP API does not require an installation. **You're ready to move to the
next step.**
# Integration / Framework Guides
Next: Identify Your Users
With Mixpanel installed, you’re now ready to identify the users who use
your product.
## FAQ
Yes, if you pass `track_pageview: true` in the `mixpanel.init()` call,
Mixpanel will automatically track a "Page View" event every time a new page is
loaded. Learn more
[here](/docs/tracking-methods/sdks/javascript#tracking-page-views).
When tracking on web, we recommend using localStorage, as this is more reliable:
```javascript theme={"system"}
mixpanel.set_config({ persistence: "localStorage" });
```
Please note that cross-subdomain tracking is not possible when using local storage. If your implementation requires cross-subdomain tracking, remove the persistence flag and use the default "cookie" persistence option.
No, our Mixpanel JavaScript SDK does not set or use any third-party cookies.
If you wish to disable cookies entirely, you can set the disable\_persistence
option to true when initializing your Mixpanel JS instance. Note that
disabling persistence will disable the use of super properties and anonymous
-> identified user tracking.
If a user opts out of tracking, you can call the `.optOutTracking()` method on any of our
client-side SDKs; this prevents any subsequent data being tracked from that user's device.
Learn more [here](/docs/privacy/protecting-user-data).
For iOS specifically: Mixpanel does not use IDFA, so it does not require user permission
through the AppTrackingTransparency(ATT) framework. For more details, refer to our
[Apple App Developer Privacy Guidance](https://mixpanel.com/legal/app-store-privacy-details).